
Wednesday, December 2, 2009

The basices of fits
Clearance Fits
A clearance fit always has a gap between the two mating parts.
The diagram below shows a clearance fit between a shaft and a hole
| |
Transitional Fits
This type of fit may result in interference, or clearance
This type of fit can be used for items such as snap fits
The figure below illustrates this condition for a hole shaft pair
 |
Interference fits always overlap and are used mainly for press fits where the two parts are pushed together, and require no other fasteners
The figure below shows an interference fit for a hole shaft pair

PRACTICE PROBLEMS
1. On a ferris wheel we have a 3.5" running journal that is to be pressure lubricated. The fit selected for this application is RC4. Use a tolerance diagram to determine the tolerances required on a final drawing. Sketch the hole, and shaft using appropriate drafting techniques.2. Do complete drawings for a 3.000" hole shaft pair if they have a RC3 fit.
3. Clearance fits are found in,
a) fitted assembly.
b) interchangeable assembly.
c) selective assembly.
d) all of the above.
4. Which statement is more true?
a) production errors cause tolerances.
b) there are no standard tolerances.
c) both a) and b) are completely true.
d) neither a) or b) is true.
5. Given the diagram below, what will the average interference/clearance be?
a) 0.008"
b) 0.020"
c) 0.032"
d) none of the above
 |
7. A hole shaft pair uses a bushing. We know that the fit between the shaft and bushing is LC5, with a nominal diameter of 7" and the fit between the bushing and outer hole is 8" with an FN3 fit. (8%)
a) Draw the tolerance diagrams.
b) Draw the final parts with dimensions and tolerances.
8. What will the gap between the shaft and the bushing be?

PRACTICE PROBLEMS
1. What are measurement standards?
ans. Standards are objects of known size, quantity, roughness, etc. These standards are used to calibrate and verify measuring instruments. As a result, measured values are more accurate.
2. What effect will temperature variation have on precision measurements?
ans. Temperature control during measurement is important because as materials are heated they expand. Each material expands at a different rate. This leads to distortion of parts and measuring devices that results in measurement errors.
3. How can a vernier scale provide higher accuracy?
ans. A vernier scale uses a second elongated scale to interpolate values on a major scale.
4. What are dimensional tolerances, and what are their primary uses?
ans. Dimensional tolerances specify the amount a dimension may vary about a target value. These are supplied by a designer to ensure the correct function of a device. If these tolerances are controlled the final product will work as planned.
5. Why is an allowance different from a tolerance?
ans. A tolerance is the amount a single dimension can vary. An allowance is an intentional difference between two dimensions to allow for press fits, running fits, etc.
6. What are fits?
ans. There are standard for different types of fits (e.g. press fit, running clearance). These specify the allowance of two parts, so that they may be made separately and then joined (mated) in an assembly.
7. What is the difference between precision and accuracy?
ans. Precision suggests a limit of technology, accuracy is the ability to achieve a value consistently. These are often interchanged because we are usually concerned with the accuracy when producing precision parts.
8. If a steel ruler expands 1% because of a temperature change, and we are measuring a 2" length, what will the measured dimension be?
ans. If we assume that only the steel rule expands, and not the steel part, we can calculate,
9. Draw the scales for a vernier micrometer reading 0.3997".
 |
Defination of Metrology
Accuracy - The expected ability for a system to discriminate between two settings.
Assembly - the connection of two or more separate parts to make a new single part.
Basic Dimension - The target dimension for a part. This typically has an associated tolerance.
Dimension - A size of a feature, either measured, or specified.
Dimensional Metrology - The use of instruments to determine object sizes shapes, form, etc.
English System - See Imperial.
Error - a discrepency between expected, and actual values.
Imperial System - An older system of measurement, still in use in some places, but generally replaced by the metric system.
Limits - These typically define a dimensional range that a measurement can be expected to fall within.
Machine Tool - Generally use to refer to a machine that performs a manufacturing operation. This is sometimes confused with the actual cutting tools, such as a drill bit, that do the cutting.
Measurement - The determination of an unknown dimension. This requires that known standards be used directly, or indirectly for comparison.
Metric System - A measurement system that has been standardized globally, and is commonly used in all modern engineering projects.
Metrology - The science of measurement. The purpose of this discipline it to establish means of determining physical quantities, such as dimensions, temperature, force, etc.
Precision - Implies a high degree of accuracy.
Repeatability - Imperfections in mechanical systems can mean that during a Mechanical cycle, a process does not stop at the same location, or move through the same spot each time. The variation range is refered to as repeatability.
Standards - a known set of dimensions, or ideals to compare others against.
Standard Sizes - a component, or a dimension that is chosen from a table of standard sizes/forms.
Tolerance - The allowable variation in a basic dimension before a part is considered unacceptable

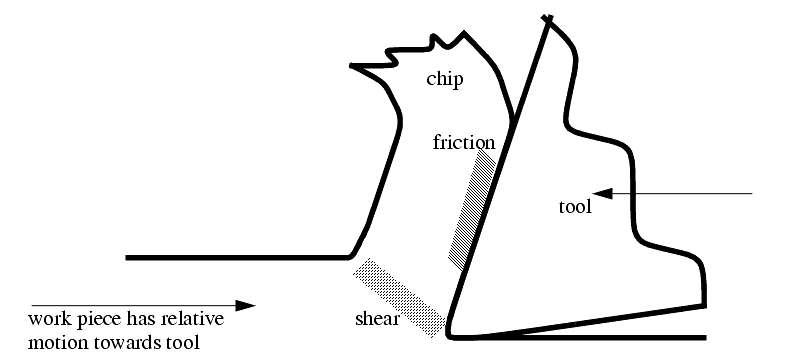
THE MECHANISM OF CUTTING
Assuming that the cutting action is continuous we can develop a continuous model of cutting conditions.
The velocities are also important, and can be calculated for later use in power calculations. The Velocity diagram below can also be drawn to find cutting velocities.

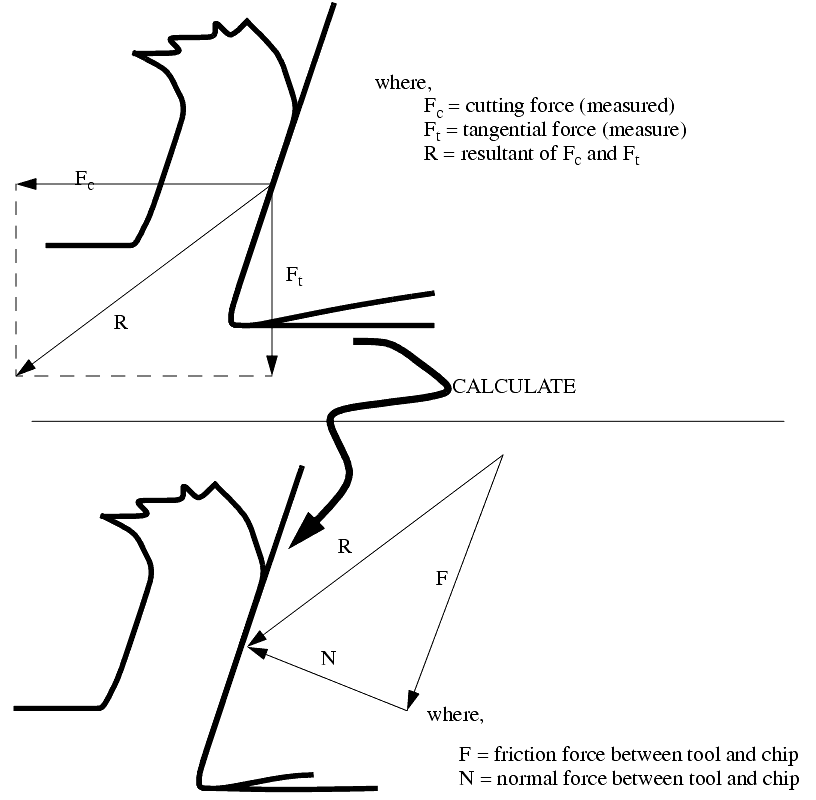
A final note of interest to readers not completely familiar with vectors, the forces Fc and Ft, are used to find R, from that two other sets of equivalent forces are found.,

Orthogonal Cutting - assumes that the cutting edge of the tool is set in a position that is perpendicular to the direction of relative work or tool motion. This allows us to deal with forces that act only in one plane.
We can obtain orthogonal cutting by turning a thin walled tube, and setting the lath bit cutting edge perpendicular to the tube axis.
Next, we can begin to consider cutting forces, chip thicknesses, etc.
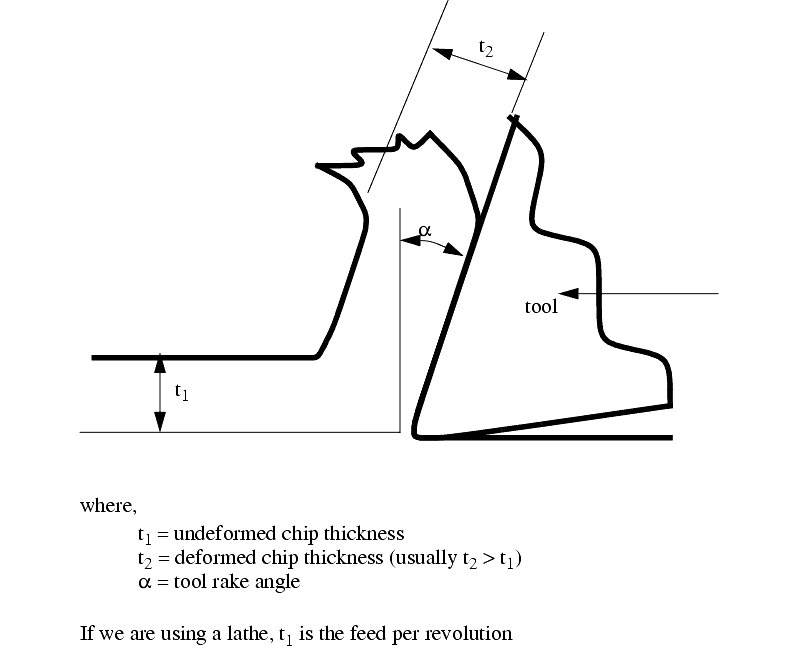
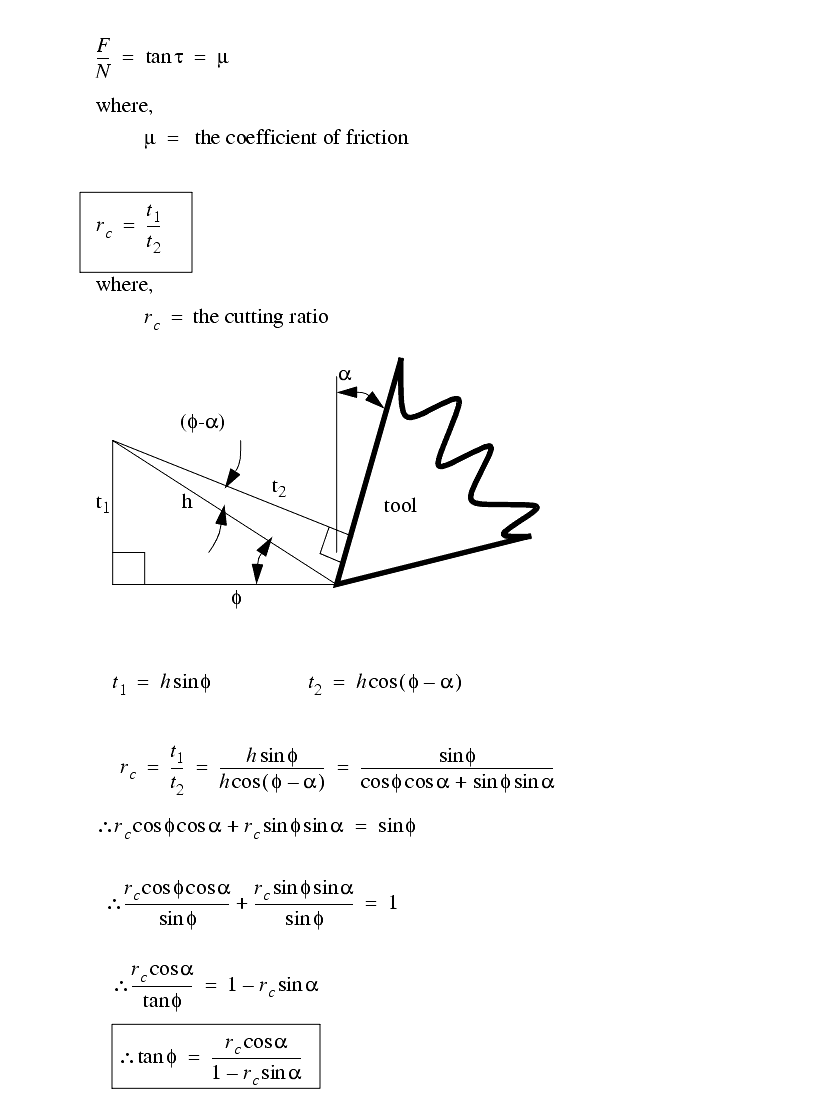
First, consider the physical geometry of cutting,
Next, we assume that we are also measuring two perpendicular cutting forces that are horizontal, and perpendicular to the figure above. This then allows us to examine specific forces involved with the cutting. The cutting forces in the figure below (Fc and Ft) are measured using a tool force dy namometer mounted on the lathe.
Force Calculations
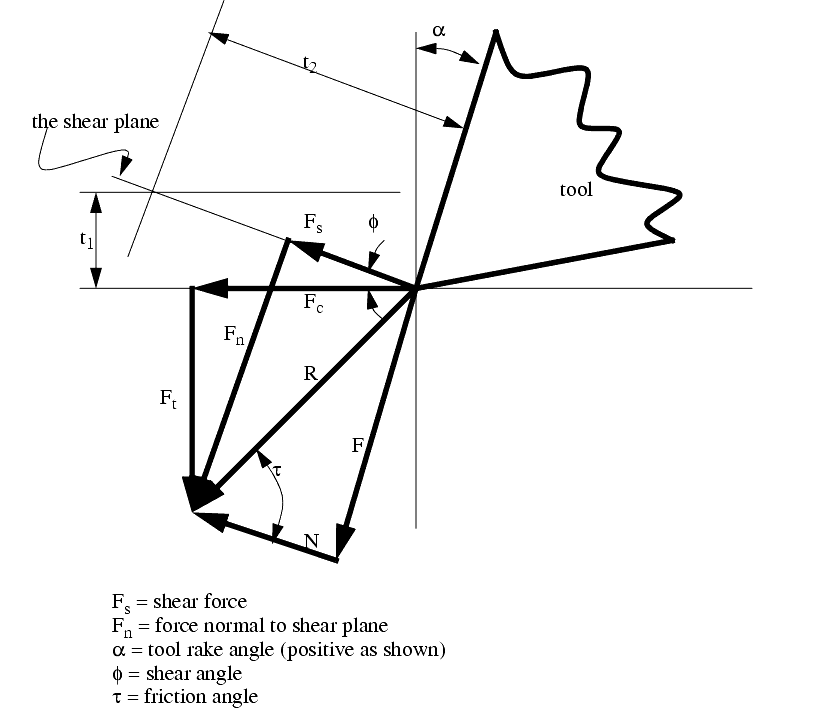
The forces and angles involved in cutting are drawn below,
Having seen the vector based determination of the cutting forces, we can now look at equivalent calculations

The velocities are also important, and can be calculated for later use in power calculations. The Velocity diagram below can also be drawn to find cutting velocities.
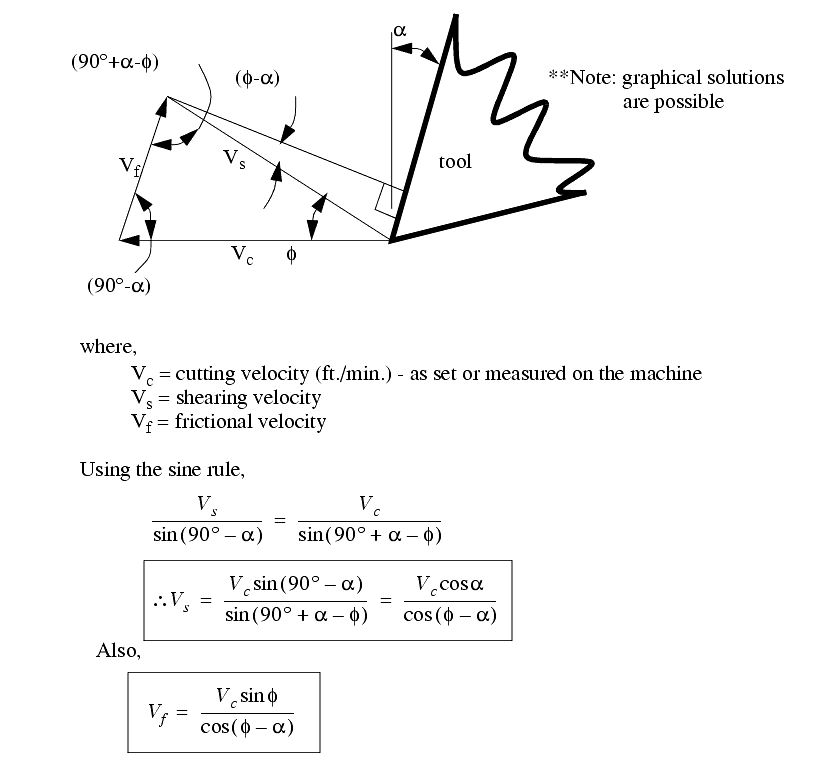
A final note of interest to readers not completely familiar with vectors, the forces Fc and Ft, are used to find R, from that two other sets of equivalent forces are found.,
Merchant's Force Circle With Drafting (Optional)
Merchant's Force Circle is a method for calculating the various forces involved in the cutting process. This will first be explained with vector diagrams, these in turn will be followed by a few formulas.
The procedure to construct a merchants force circle diagram (using drafting techniques/instruments) is,
1. Set up x-y axis labeled with forces, and the origin in the centre of the page. The scale should be enough to include both the measured forces. The cutting force (Fc) is drawn horizontally, and the tangential force (Ft) is drawn vertically. (These forces will all be in the lower left hand quadrant) (Note: square graph paper and equal x & y scales are essential)
2. Draw in the resultant (R) of Fc and Ft.
3. Locate the centre of R, and draw a circle that encloses vector R. If done correctly, the heads and tails of all 3 vectors will lie on this circle.
4. Draw in the cutting tool in the upper right hand quadrant, taking care to draw the correct rake angle (a) from the vertical axis.
5. Extend the line that is the cutting face of the tool (at the same rake angle) through the circle. This now gives the friction vector (F).
6. A line can now be drawn from the head of the friction vector, to the head of the resultant vector (R). This gives the normal vector (N). Also add a friction angle (t) between vectors R and N. As a side note recall that any vector can be broken down into components. Therefore, mathematically, R = Fc + Ft = F + N.
7. We next use the chip thickness, compared to the cut depth to find the shear force. To do this, the chip is drawn on before and after cut. Before drawing, select some magnification factor (e.g., 200 times) to multiply both values by. Draw a feed thickness line (t1) parallel to the horizontal axis. Next draw a chip thickness line parallel to the tool cutting face.
8. Draw a vector from the origin (tool point) towards the intersection of the two chip lines, stopping at the circle. The result will be a shear force vector (Fs). Also measure the shear force angle between Fs and Fc.
9. Finally add the shear force normal (Fn) from the head of Fs to the head of R.
10. Use a scale and protractor to measure off all distances (forces) and angles.
The resulting diagram is pictured below,

CHIP FORMATION
There are three types of chips that are commonly produced in cutting,
A discontinuous chip comes off as small chunks or particles. When we get this chip it may indicate,
A continuous chip looks like a long ribbon with a smooth shining surface. This chip type may indicate,
Continuous chips with a built up edge still look like a long ribbon, but the surface is no longer smooth and shining. This type of chip tends to indicate,
- high friction between work and tool causes high temperatures that will occasionally weld the chip to the tool. This will break free, but the effects is a rough cutting action.
Continuous chips, and subsequently continuous cutting action is generally desired.

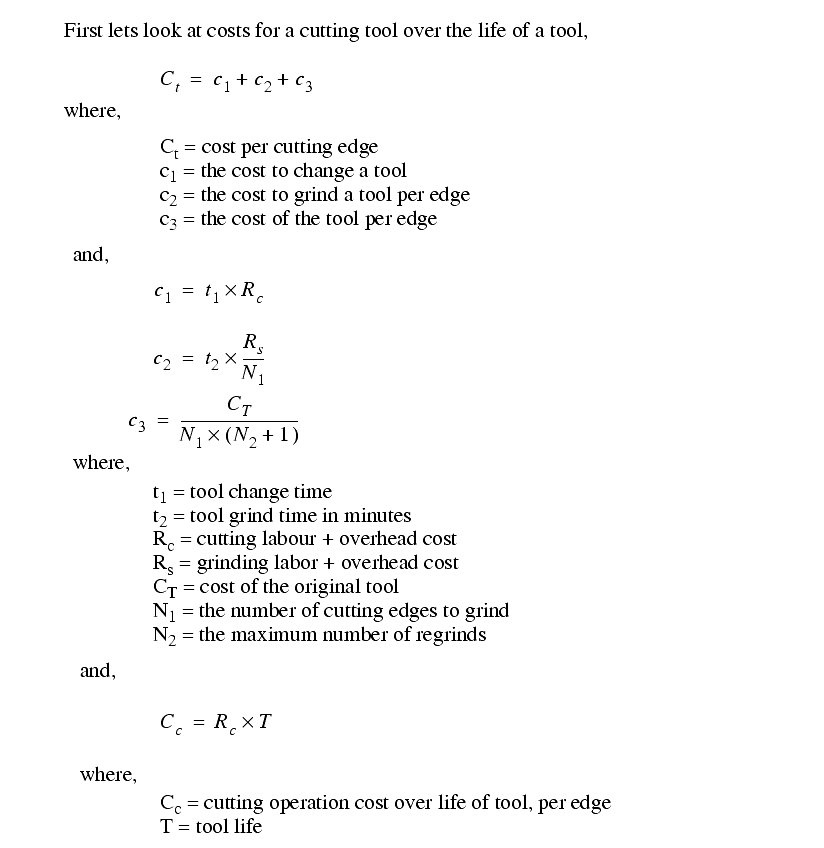
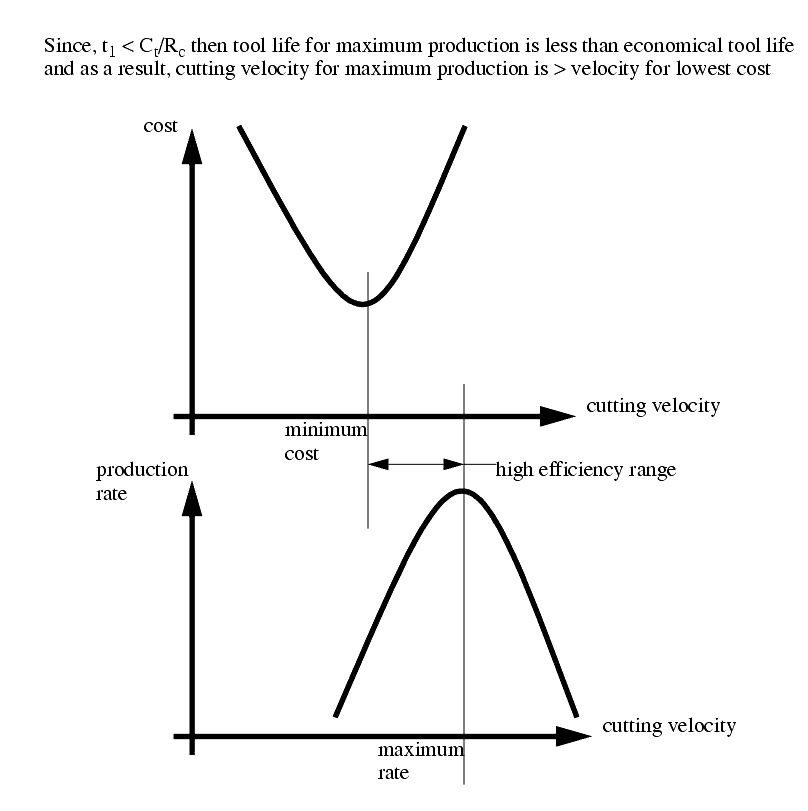
The Economics of Metal Cutting
As with most engineering problems we want to get the highest return, with the minimum investment. In this case we want to minimize costs, while increasing cutting speeds.
EFFICIENCY will be the key term - it suggests that good quality parts are produced at reasonable cost.
Cost is a primarily affected by,
The production throughput is primarily affected by,
The factors that can be modified to optimize the process are,
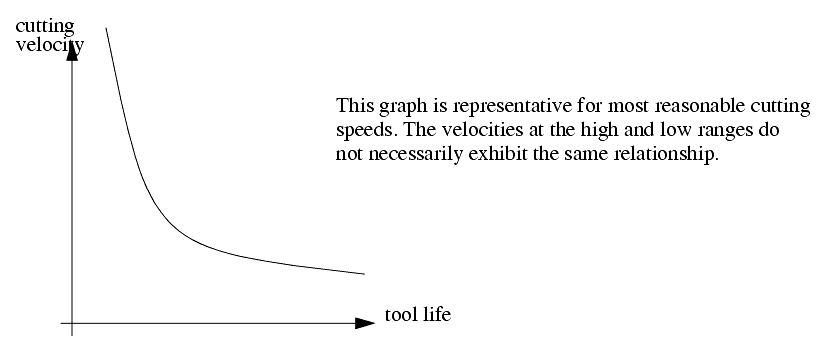
We previously considered the log-log scale graph of Taylor's tool life equation, but we may also graph it normally to emphasize the effects.
There are two basic conditions to trade off,

A simplified treatment of the problem is given below for optimizing cost,

We can also look at optimizing production rates,
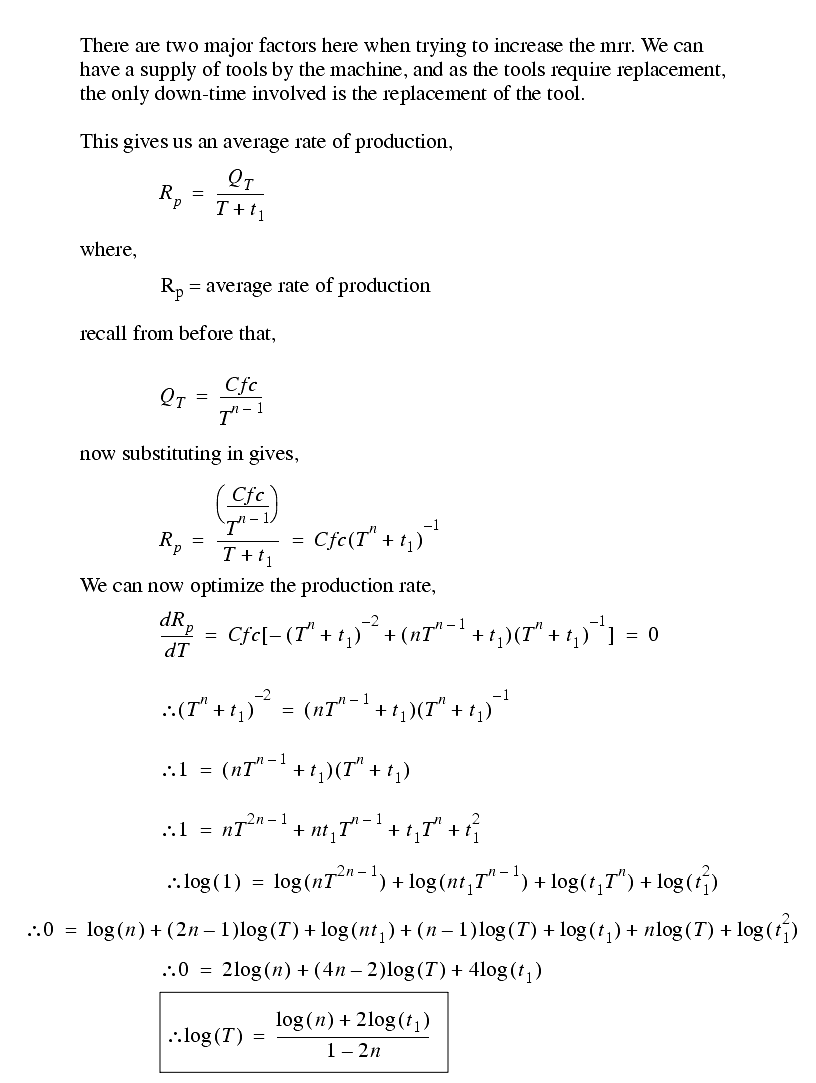
We can now put the two optimums in perspective,

TOOL LIFE

Causes of tool wear
Hard particle wear (abrasive wear)
Adhesive wear
Diffusion wear
Chemical wear
Fracture wear
a) Hard particle wear (abrasive wear)
Abrasive wear is mainly caused by the impurities within the workpiece material, such as carbon, nitride and oxide compounds, as well as the built-up fragments. This is a mechanical wear, and it is the main cause of the tool wear at low cutting speeds.
b) Adhesive wear mechanism
The simple mechanism of friction and wear proposed by Bowden and Tabor is based on the concept of the formation of welded junctions and subsequent destruction of these.
Due to the high pressure and temperature, welding occurs between the fresh surface of the chip and rake face (chip rubbing on the rake face results in a chemically clean surface). [Process is used to advantage when Friction Welding to produce twist drills, and broaches, and in tool manufacturing]
Severe wear is characterised by considerable welding and tearing of the softer rubbing surface at high wear rate, and the formation of relatively large wear particles.
Under mild wear conditions, the surface finish of the sliding surfaces improves
c) Diffusion wear
Holm thought of wear as a process of atomic transfer at contacting asperities (Armarego and Brown).
A number of workers have considered that the mechanism of tool wear must involve chemical action and diffusion. They have demonstrated welding and preferred chemical attack of tungsten carbide in tungsten-titanium carbides. They have shown the photo-micrograph evidence of the diffusion of tool constituents into the workpiece and chip.
This diffusion results in changes of the tool and workpiece chemical composition.
There are several ways in which the wear may be dependent on the diffusion mechanism.
1. Gross softening of the tool
Diffusion of carbon in a relatively deep surface layer of the tool may cause softening and subsequent plastic flow of the tool. This flow may produce major changes in the tool geometry, which result in high forces and a sudden complete failure of the tool.
2. Diffusion of major tool constituents into the work. (chemical element loss)
The tool matrix or a major strengthening constituent may be dissolved into the work and chip surfaces as they pass the tool.
In cast alloy, carbide or ceramic tools, this may be the prime wear phenomenon.
With HSS tools, iron diffusion is possible, but it seems unlikely to be the predominant wear process.
Diamond tool - cutting iron and steel is the typical example of carbon diffusion.
3. Diffusion of a work-material component into the tool
A constituent of the work material diffusing into the tool may alter the physical properties of a surface layer of the tool. For example, the diffusion of lead into the tool may produce a thin brittle surface layer, this thin layer can be removed by fracture or chipping.
d) Chemical wear
Corrosive wear (due to chemical attack of a surface)
e) Facture wear
Fracture can be the catatrophic end of the cutting edge. The bulk breakage is the most harmful type of wear and should be avoided as far as possible.
Chipping of brittle surfaces
Other forms of tool wear
Thermo-electric wear can be observed in high temperature region, and it reduces the tool wear.
The high temperature results in the formation of thermalcouple between the workpiece and the tool. Due to the heat related voltage established between the workpiece and tool, it may cause an electric current between the two. However, the mechanism of thermo-electric wear has not been clearly developed. Major improvement (decrease) of tool wear has been seen through experimental tests with an isolated tool and component.
Thermal Cracking and Tool Fracture
In milling, tools are subjected to cyclic thermal and mechanical loads. Teeth may fail by a mechanism not observed in continuous cutting. Two common failure mechanisms unique to milling are thermal cracking and entry failure.
The cyclic variations in temperature in milling induce cyclic thermal stress as the surface layer of the tool expands and contracts. This can lead to the formation of thermal fatigue cracks near the cutting edge. In most cases such cracks are perpendicular to the cutting edge and begin forming at the outer corner of the tool, spreading inward as cutting progresses. The growth of these cracks eventually leads to edge chipping or tool breakage.
Thermal cracking can be reduced by reducing the cutting speed or by using a tool material grade with a higher thermal shock resistance. In applications when coolant is supplied, adjusting the coolant volume can also reduce crack formation. An intermittent coolant supply or insufficient coolant can promote crack formation; if a steady, copious volume of coolant cannot be supplied, tool-life can often be increased by switching to dry cutting.
Edge chipping is common in milling. Chipping may occur when the tool first contacts the part (entry failure) or, more commonly, when it exits the part (exit failure). WC tool materials are especially prone to this.
Entry failure most commonly occurs when the outer corner of the insert strikes the part first. This is more likely to occur when the cutter rake angles are positive. Entry failure is therefore most easily prevented by switching from positive to negative rake cutters.
EFFECTS OF THE TOOL WEAR ON TECHNOLOGICAL PERFORMANCE MEASURES.
Consequences of tool wear
1. Increase the cutting force;
2. Increase the surface roughness;
3. Decrease the dimensional accuracy;
4. Increase the temperature;
5. Vibration;
6. Lower the production efficiency, component quality;
7. Increase the cost.
Influence on cutting forces
Crater wear, flank wear (or wear-land formation) and chipping of the cutting edge affect the performance of the cutting tool in various ways. The cutting forces are normally increased by wear of the tool. Crater wear may, however, under certain circumstances, reduce forces by effectively increasing the rake angle of the tool. Clearance-face (flank or wear-land) wear and chipping almost invariably increase the cutting forces due to increased rubbing forces.
Surface finish (roughness)
The surface finish produced in a machining operation usually deteriorates as the tool wears. This is particularly true of a tool worn by chipping and generally the case for a tool with flank-land wear - although there are circumstances in which a wear land may burnish (polish) the workpiece and produce a good finish.
Dimensional accuracy:
Flank wear influences the plan geometry of a tool; this may affect the dimensions of the component produced in a machine with set cutting tool position or it may influence the shape of the components produced in an operation utilizing a form tool.
(If tool wear is rapid, cylindrical turning could result in a tapered workpiece)
Vibration or chatter
Vibration or chatter is another aspect of the cutting process which may be influenced by tool wear. A wear land increases the tendency of a tool to dynamic instability. A cutting operation which is quite free of vibration when the tool is sharp, may be subjected to an unacceptable chatter mode when the tool wears.

Tool wear
Tool wear describes the gradual failure of cutting tools due to regular operation. It is a term often associated with tipped tools, tool bits, or drill bits that are used with machine tools.
Tool wear phenomena
Types of wear include:
* flank wear in which the portion of the tool in contact with the finished part erodes. Can be described using the Tool Life Expectancy equation.
* crater wear in which contact with chips erodes the rake face. This is somewhat normal for tool wear, and does not seriously degrade the use of a tool until it becomes serious enough to cause a cutting edge failure.

Can be caused by spindle speed that is too low or a feed rate that is too high. In orthogonal cutting this typically occurs where the tool temperature is highest. Crater wear occurs approximately at a height equaling the cutting depth of the material. Crater wear depth ~ t0 t0= cutting depth
* built-up edge in which material being machined builds up on the cutting edge. Some materials (notably aluminum and copper) have a tendency to anneal themselves to the cutting edge of a tool. It occurs most frequently on softer metals, with a lower melting point. It can be prevented by increasing cutting speeds and using lubricant. When drilling it can be noticed as alternating dark and shiny rings.
* glazing occurs on grinding wheels, and occurs when the exposed abrasive becomes dulled. It is noticeable as a sheen while the wheel is in motion.
* edge wear, in drills, refers to wear to the outer edge of a drill bit around the cutting face caused by excessive cutting speed. It extends down the drill flutes, and requires a large volume of material to be removed from the drill bit before it can be corrected.
Effects of Tool Wear
Some General effects of tool wear include:
* increased cutting forces
* increased cutting temperatures
* poor surface finish
* decreased accuracy of finished part
Reduction in tool wear can be accomplished by using lubricants and coolants while machining. These reduce friction and temperature, thus reducing the tool wear.
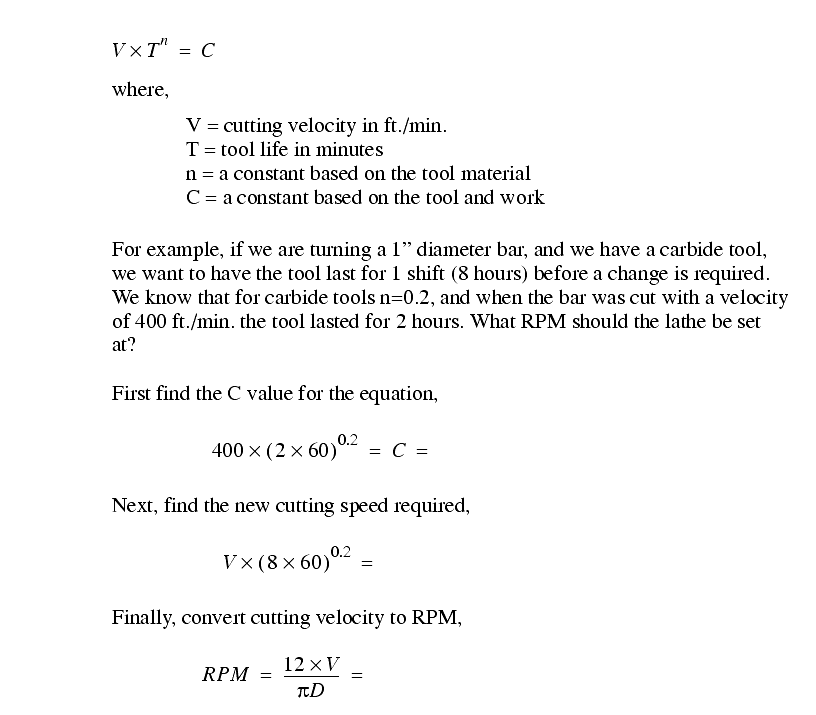
Tool Life Expectancy
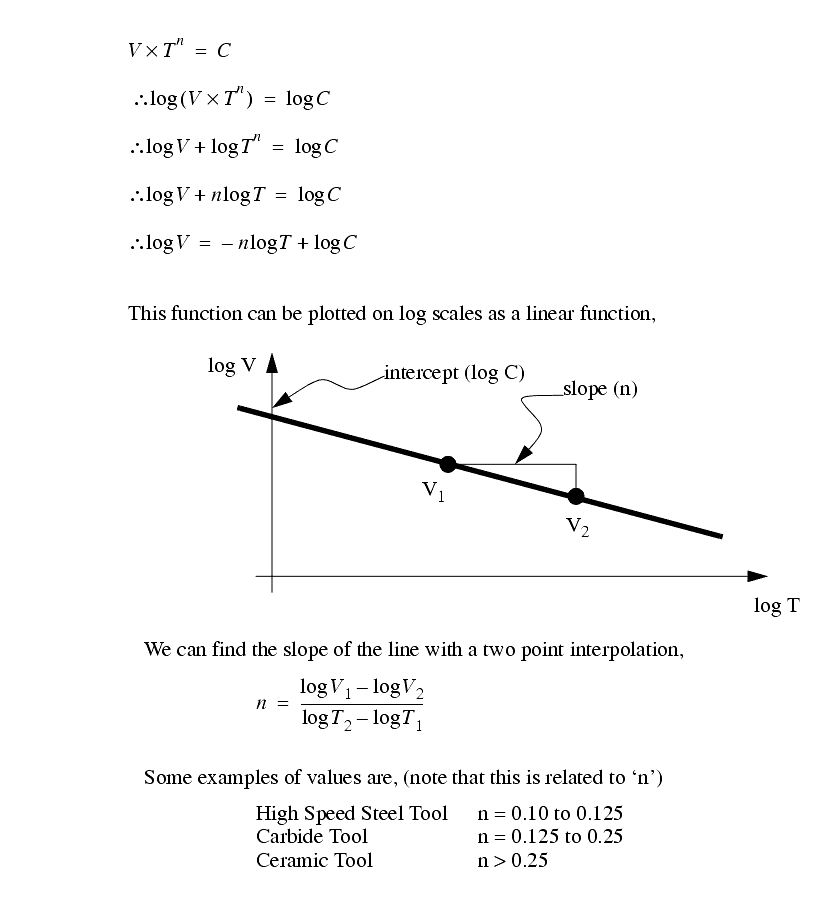
The Taylor Equation for Tool Life Expectancy provides a good approximation.
VcTn = C
A more general form of the equation is
V_c T^n \times D^x f^y=C
where
* Vc=cutting speed
* T=tool life
* D=depth of cut
* F=feed rate
* x and y are determined experimentally
* n and C are constants found by experimentation or published data; they are properties of tool material, workpiece and feed rate.
Temperature Considerations
 At high temperature zones crater wear occurs. The highest temperature of the tool can exceed 700 °C and occurs at the rake face whereas the lowest temperature can be 500 °C or lower depending on the tool.ram
Energy Considerations
Energy comes in the form of heat from tool friction. It is a reasonable assumption that 80% of energy from cutting is carried away in the chip. If not for this the workpiece and the tool would be much hotter than what is experienced. The tool and the workpiece each carry approximately 10% of the energy. The percent of energy carried away in the chip increases as the speed of the cutting operation increases. This somewhat offsets the tool wear from increased cutting speeds. In fact, if not for the energy taken away in the chip increasing as cutting speed is increased; the tool would wear more quickly than is found.
Effects of cutting speed V and cutting time T on crater wear depth KT
Chipping of the tool, as the name implies, involves removal of relatively large discrete particles of tool material. Tools subjected to discontinuous cutting conditions are particularly prone to chipping. Chipping of the cutting edge is more like micro-breakages rather than conventional wear.
Tool wear phenomena
Types of wear include:
* flank wear in which the portion of the tool in contact with the finished part erodes. Can be described using the Tool Life Expectancy equation.
* crater wear in which contact with chips erodes the rake face. This is somewhat normal for tool wear, and does not seriously degrade the use of a tool until it becomes serious enough to cause a cutting edge failure.

Can be caused by spindle speed that is too low or a feed rate that is too high. In orthogonal cutting this typically occurs where the tool temperature is highest. Crater wear occurs approximately at a height equaling the cutting depth of the material. Crater wear depth ~ t0 t0= cutting depth
* built-up edge in which material being machined builds up on the cutting edge. Some materials (notably aluminum and copper) have a tendency to anneal themselves to the cutting edge of a tool. It occurs most frequently on softer metals, with a lower melting point. It can be prevented by increasing cutting speeds and using lubricant. When drilling it can be noticed as alternating dark and shiny rings.
* glazing occurs on grinding wheels, and occurs when the exposed abrasive becomes dulled. It is noticeable as a sheen while the wheel is in motion.
* edge wear, in drills, refers to wear to the outer edge of a drill bit around the cutting face caused by excessive cutting speed. It extends down the drill flutes, and requires a large volume of material to be removed from the drill bit before it can be corrected.
Effects of Tool Wear
Some General effects of tool wear include:
* increased cutting forces
* increased cutting temperatures
* poor surface finish
* decreased accuracy of finished part
Reduction in tool wear can be accomplished by using lubricants and coolants while machining. These reduce friction and temperature, thus reducing the tool wear.
Tool Life Expectancy
The Taylor Equation for Tool Life Expectancy provides a good approximation.
VcTn = C
A more general form of the equation is
V_c T^n \times D^x f^y=C
where
* Vc=cutting speed
* T=tool life
* D=depth of cut
* F=feed rate
* x and y are determined experimentally
* n and C are constants found by experimentation or published data; they are properties of tool material, workpiece and feed rate.
Temperature Considerations
 At high temperature zones crater wear occurs. The highest temperature of the tool can exceed 700 °C and occurs at the rake face whereas the lowest temperature can be 500 °C or lower depending on the tool.ram
Energy Considerations
Energy comes in the form of heat from tool friction. It is a reasonable assumption that 80% of energy from cutting is carried away in the chip. If not for this the workpiece and the tool would be much hotter than what is experienced. The tool and the workpiece each carry approximately 10% of the energy. The percent of energy carried away in the chip increases as the speed of the cutting operation increases. This somewhat offsets the tool wear from increased cutting speeds. In fact, if not for the energy taken away in the chip increasing as cutting speed is increased; the tool would wear more quickly than is found.
Effects of cutting speed V and cutting time T on crater wear depth KT

Notch wear
This is a special type of combined flank and rake face wear which occurs adjacent to the point where the major cutting edge intersects the work surface.
The gashing (or grooving, gouging) at the outer edge of the wear land is an indication of a hard or abrasive skin on the work material. Such a skin may develop during the first machine pass over a forging, casting or hot-rolled workpiece. It is also common in machining of materials with high work-hardening characteristics, including many stainless steels and heat-resistant nickel or chromium alloys. In this case , the previous machining operation leaves a thin work-hardened skin.

Chipping of the tool, as the name implies, involves removal of relatively large discrete particles of tool material. Tools subjected to discontinuous cutting conditions are particularly prone to chipping. Chipping of the cutting edge is more like micro-breakages rather than conventional wear.
Built-up edge formation also has a tendency to promote tool chipping. A built-up edge is never completely stable, but it periodically breaks off. Each time some of the built-up material is removed it may take with it a lump (piece) of tool edge
Ultimate failure
The final result of tool wear is the complete removal of the cutting point - ultimate failure of the tool.
This may come about by temperature rise, which virtually causes the tool tip to soften until it flows plastically at very low shear stress. This melting process seems to start right at the cutting edge and because material flow blunts the edge, the melting process continues back into the tool; within a few seconds a piece of tool almost as large as the engaged depth of cut is removed.
An alternative mechanism of ultimate failure is the mechanical failure (usually a brittle fracture) of a relatively large portion of the cutting tip. This often results from a weakening of the tool by crater formation.
Ultimate failure by melting and plastic flow is most common in carbon and high-speed-steel tools, while fracture failures are most common in sintered carbide or ceramic tools.
Typical stages of tool wear in normal cutting situation

1- Initial (or Preliminary) wear region:
Caused by micro-cracking, surface oxidation and carbon loss layer, as well as micro-roughness at the cutting tool tip in tool grinding (manufacturing). For the new cutting edge, the small contact area and high contact pressure will result in high wear rate. The initial wear size is VB=0.05-0.1mm normally.
2- Steady wear region
After the initial (or preliminary) wear (cutting edge rounding), the micro-roughness isimproved, in this region the wear size is proportional to the cutting time. The wear rate is relatively constant.
3- Severe (or Ultimate or catastrophic) wear:
When the wear size increases to a critical value, the surface roughness of the machined surface decreases, cutting force and temperature increase rapidly, and the wear rate increases. Then the tool loses its cutting ability. In practice, this region of wear should be avoided.
Flank wear and chipping will increase the friction, so that the total cutting force will increase. The component surface roughness will be increased, especially when chipping occurs.
Flank wear will also affect the component dimensional accuracy. When form tools are used, flank wear will also change the shape of the component produced.
Industrial engineering
Industrial engineering is a branch of engineering that concerns with the development, improvement, implementation and evaluation of integrated systems of people, money, knowledge, information, equipment, energy, material and process. It also deals with designing new prototypes to help save money and make the prototype better. Industrial engineering draws upon the principles and methods of engineering analysis and synthesis, as well as mathematical, physical and social sciences together with the principles and methods of engineering analysis and design to specify, predict and evaluate the results to be obtained from such systems. In lean manufacturing systems, Industrial engineers work to eliminate wastes of time, money, materials, energy, and other resources.
Industrial engineering is also known as operations management, management science, systems engineering, or manufacturing engineering; a distinction that seems to depend on the viewpoint or motives of the user. Recruiters or educational establishments use the names to differentiate themselves from others. In healthcare, for example, industrial engineers are more commonly known as management engineers or health systems engineers.
The term "industrial" in industrial engineering can be misleading. While the term originally applied to manufacturing, it has grown to encompass virtually all other industries and services as well. The various topics of concern to industrial engineers include management science, financial engineering, engineering management, supply chain management, process engineering, operations research, systems engineering, ergonomics, value engineering and quality engineering.
Examples of where industrial engineering might be used include designing a new loan system for a bank, streamlining operation and emergency rooms in a hospital, distributing products worldwide (referred to as Supply Chain Management), and shortening lines (or queues) at a bank, hospital, or a theme park. Industrial engineers typically use computer simulation, especially discrete event simulation, for system analysis and evaluation.
Examples of famous Industrial Engineers include Susan Story, CEO of Gulf Power and Mohammad Barghash, a Jordanian Industrial Engineer well known in the United Arab Emirates and Australia for his revolutionary business ideas and skills in Activity Based Costing.
History
Industrial engineering courses had been taught by multiple universities in the late 1800s along Europe, especially in developed countries such as Germany, France, the United Kingdom, and Spain. In the United States, the first department of industrial engineering was established in 1908 as the Harold and Inge Marcus Department of Industrial and Manufacturing Engineering at Penn State. In India, the first department was established at the National Institute of Industrial Engineering, Mumbai. Industrial Engineering and Management is provided as an Engineering Course at Under-Graduate level by The Vishweshwariah Technological University or VTU, Belgaum, India.
The first doctoral degree in industrial engineering was awarded in the 1930s by Cornell University.
Salaries and workforce statistics
The total number of engineers employed in the U.S. in 2006 was roughly 1.5 million. Of these, 201,000 were industrial engineers (13.3%), the third most popular engineering specialty. The average starting salaries being $55,067 with a bachelor's degree, $64,759 with a master's degree, and $77,364 with a doctorate degree. This places industrial engineering at 7th of 15 among engineering bachelors degrees, 3rd of 10 among masters degrees, and 2nd of 7 among doctorate degrees in average annual salary.The median annual income of industrial engineers in the U.S. workforce is $68,620.
Typically, within a few years after graduation, industrial engineers move to management positions because their work is closely related to management.

